Black And White Separations For Duplicating And Conserving Colour Negatives
In this system (originally widely used since it's publication in 1947 by Eastman Kodak, but now rarely employed for it’s original purpose) black-and-white separation positives are made from an original colour negative. The process was a development of the many three-strip colour camera systems in use from about 1930. The master positives can be stored. If, later, they are to be reconstituted to create a new negative, they are printed in register onto a multilayer colour film to give the colour duplicate negative. This system has the advantage of providing a more or less permanent record of the valuable original because of the keeping characteristics of processed black-and-white films. Where negatives differing in size from the camera negative are required, the operation of printing in register three black-and-white positives is both difficult and expensive.
Archive laboratories use both the original commercial process and derivatives of it. The black and white film stocks used were originally designed for duplicating masked colour negatives but are also used to make separation negatives from unmasked colour negatives, colour prints, or any other colour intermediate or even a coloured nitrate film. These derivative processes are generally used to correct for faded dyes and are described later.
|
Contents: |
Procedure
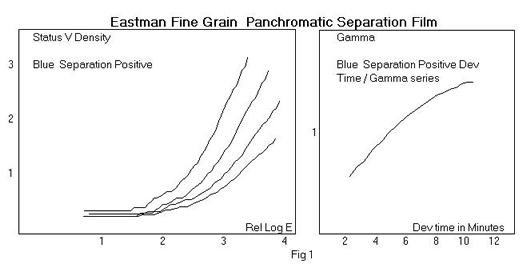
The initial step in the system utilising black and white or master positives is to prepare the time-gamma curves for the material being used. A set of sensitometric control strips is exposed using the same intensity level and filters as would be used in printing picture material. These are the tricolour filters. The strips are processed for a series of times in the equipment regularly employed for processing picture footage.
The densities of the strips are measured and the corresponding characteristic curves for exposure to blue, green and red light are plotted. The gamma value for each curve is determined and time-gamma curves are also plotted. These time-gamma curves are used later in the procedure to permit choice of the appropriate development time for a specified gamma.
For the first trials it is desirable to duplicate only a short length of original colour negative. It is most convenient to prepare a printer test loop consisting of a processed colour negative sensitometric strip and a few frames of the scenes to be duplicated.
Determination of Master Positive Control Gammas
In the usual case, when duplicating a colour negative, it is required that the colour duplicate negative will have the same contrast as the original negative. Following the Contrast Rule, which defines that contrasts multiply when copied photographically, this means that the overall gamma of the duplicating step should equal 1.0.
If SP represents the gamma of the particular separation positive and DN represents the gamma of the colour duplicate negative, then:
Separation Positive Gamma x Duplicate Negative Gamma = 1.0
SP x DN = 1.0
Since DN is fixed by the particular emulsion number of the colour duplicating material being used and the processing of this material, we can determine the correct gamma for each of the separation positives by the relationships:
SP (blue) = 1
________
DN (blue)
SP (green) = 1
________
DN (green)
SP (red) = 1
_______
DN (red)
In practice these equations have to be modified further because the print-through gammas of the separation positives are not the same as would be predicted on the basis of the integral densitometer measurements. These printing factors (PB, PG, and PR) associated with each of the separations when printing onto the colour duplicating negative film are to take into account the flare and other influences on the image contributed by the printer. The above equations then become
SP (blue) = 1
____________
PB DN (blue)
SP (green) = 1
____________
PB DN (green)
SP (red) = 1
____________
PB DN (red)
Initially it is convenient to assume that PB, PG and PR are each equal to 1.0, and to make a more precise determination later in the procedure.
The step-by-step determination of the required control gammas for the separation positives is as follows:
Step 1 Obtain a sensitometric control strip for the original colour negative process. [If the original negative being duplicated is an old archival negative, of a long defunct process the best procedure has been found to be to use a modern colour negative control strip, if the original being worked on is a masked negative. If the original is an unmasked negative it is better to use a colour print film strip, and some laboratories use a modern colour print film strip with a relatively neutral grey scale for this purpose. Print films have much higher maximum densities and higher contrasts than any negative film has ever had and it is essential to recognise that this film strip is simply a set of densities that will be used as a guide to represent the densities of an old negative.
[Step 2 Optional - Measure the integral densities of the steps of the control strip obtained in step 1, to blue, green and red light and plot the corresponding characteristic curves. This is not an essential step, but useful to see the positions on the curve of the fixed points established later].
Step 3 Obtain a sensitometric control strip for the colour duplicate negative process (for example a correctly processed Colour Intermediate control strip].
Step 4 Measure the integral densities of the steps of the control strip obtained in step 3, to blue, green and red light, and plot the curves
Step 5 Measure the gammas of the curves obtained in step 4, and calculate the reciprocals of these gammas. For example if:
DN (Blue)= 1.02
DN (Green)= 1.04
DN (Red)= 0.93
then:
SP (blue) =1/1.02= 0.98
SP (green) = 1/1.04 = 0.96
SP (red) =1/0.93= 1.07
These gamma values are best calculated as the parameter Best Fit Contrast [BFC], although the parameter Average Gradient [AG] used for the process control of colour intermediate films can also be used but is less precise. These parameters are dealt with in the chapter on Control. [BFC values are calculated in preference to true gamma values for materials with rather uneven or "shaky" DLogE curves] The values should be considered as temporary gamma values for the separation positives and they will be corrected later when the exact printing factors are determined.
Preparation of Master Positives
Step 1 Print the test loop onto the master positive material, for example Eastman Panchromatic Separation Film, type 5235, through the appropriate filters for the (Blue - Wratten 98 or Wratten 47B + 2B) (Green - Wratten 99 or Wratten 16 + 61) (Red - Wratten 70).
Step 2 Process the printed footage and control strips for a time estimated from the time-gamma curves to give the gamma values previously calculated.
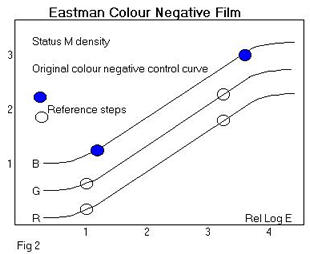
Step 3 Measure the highest and lowest integral densities of the original picture negative to blue, green and red light and plot these values on the negative control curve (a 1 mm densitometer aperture will probably be necessary to measure the image although a 3mm is more repeatable for the measurement of control strips). . The step numbers of the control strip for which the densities are closest to the picture densities can be marked on the control curve. These are reference points and the same steps should be measured and plotted on the control curves in each duplicating step. (See Figure 2.)
This is quite straightforward when the original is a modern or even an early masked film. If the original is an unmasked film the steps that most closely correspond can be used or the steps on a piece of print film that most closely corresponds can be used in stead.
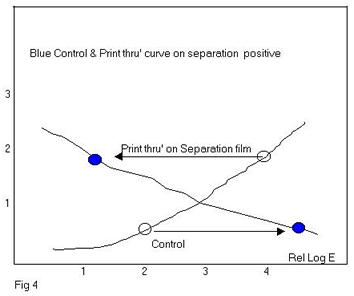
Step 4 Plot the "print through" reference steps of each of the three master positives on their respective control curves.
Step 5 Adjust the printing levels until the picture density range is placed properly on the straight-line region of the master positive control curves. If, for example, the picture density range plots too low on the control curve the exposure must be increased. Once this test process results in a set of printing levels that plot on the straight line of the master positive curves a set of separations can be made from the entire negative.
Preparation of a subsequent Colour Duplicate Negative
Step 1Using a registering type step printer, print the blue, green and red master positive grey scale strips (print through strips) onto the Eastman Colour Intermediate Film, through the appropriate filters (Blue - Wratten 98 or Wratten 2B + 47B; Green - Wratten 99 or Wratten 16 + 61; Red - Wratten 29).
Step 2 Exposure a sensitometric control strip on the colour intermediate film using an exposure time which closely matches the printer exposure.
Step 3 Process the printed grey scale and control strip together through the recommended colour intermediate process.
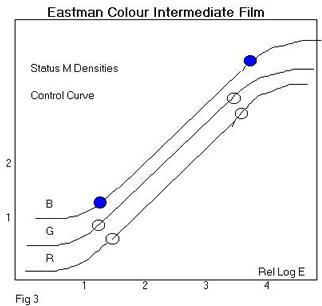
Step 4 Measure and plot the integral colour densities of the control strip to Blue, Green and Red light.
Step 5 Measure the integral colour densities of the reference steps of the grey scale and place these on the curve obtained in step 15 (See Figure 3.)
Step 6 If the picture density range does not fall on the linear portion of the control curves, adjust the exposure level accordingly and repeat the procedure.
Step 7 Compare the picture density ranges [that is the difference in density from the high to the low steps in each colour] of the colour duplicate negative with those of the original negative. In all probability, the picture density ranges will not be the same, and this means that the separation positives have printing factors which must be taken into account. If the picture density range of the colour duplicate negative is greater than that of the original negative it will be necessary to use a master positive of lower gamma to correct the situation.
If the picture density range of the colour duplicate negative is less than that of the original negative, a master positive of higher gamma will be needed.
The printing factors PB, PG and PR can be determined by the relationship:
PB, PG, or PR= Density Range of Colour Duplicate Negative
Density Range of Original Negative
The gamma values of the three separation positives are then corrected
simply by multiplying by their corresponding printing factors. It is at this
stage that corrections for the differences due to using a different original
material to that used in the initial test loop can be made. An early unmasked
negative can be set up with a print control strip and the corrections made at
this point when the density ranges of the original and the duplicate negative
can be compared.
Step 8 Repeat Steps 1 - 5 applying the correction factors determined in step 18 to obtain the correct gammas and development times. Since printing exposure levels have been established, the picture original may now be duplicated. As a check on the processing conditions for the master positives, sensitometric control strips should be included in the footage.
Step 9 Repeat steps under 'Preparation of a subsequent Colour Duplicate Negative'. Again, include sensitometric control strips as a check on the processing of the colour duplicate negative. The density ranges of the colour duplicate negatives should now closely match those of the original negative.
This procedure may seem time consuming and tedious but it only need be set up fully once for each type of original material and needs to be checked again when the batch of black and white separation film or colour intermediate is changed.
The differences in a well set up procedure and an empirically guessed one are considerable and the final print of a poorly set up system usually exhibits cross contrast.
Early negatives duplicated by this method are generally good although a few did not have the same aim contrasts as the majority. Most early and later masked negatives including
Those of today all aimed for contrasts of about 0.60 and this makes the routine used for modern separation making valid for all these stocks. However some early colour negatives appear to have higher contrasts and these require special treatment, as the modern print film is too high in contrast if a duplicate negative with a contrast of 1.0 is produced. The separation films are capable of operating at lower values, perhaps down to 0.7 and this allows lower contrast duplication overall. Inevitably this requires a great deal of trial and error.
BLACK AND WHITE SEPARATION METHOD FOR RESTORING COLOUR PRINTS
Eastman Panchromatic Separation film is also used to produce separation negatives from colour prints. The resulting negatives can be printed to make separation positives, and then printed in register to make a new colour negative on Eastman Intermediate as in the last stage of the procedure above.
This long and often difficult procedure is often the only way to make a presentable image from an old faded colour print or colour reversal.
Colour Print Contrast: 1.5
3 Separation Negatives Contrast: 1.0
Prints from 3 Separation Negatives Contrast: 0.4
Eastman Intermediate Negative Contrast: 1.0
Colour Print Film Contrast: 2.5
Final print contrast: 1.5
The procedure for preparing the separation negatives follows that of making separation positives from negatives but the contrast of the two black and white stages must be related so that the product of the two is one for each colour record. In the example above the material used for making the separation negatives was Eastman Panchromatic Separation Film, which has natural gamma of about 1.0, and the prints from these are made on any Eastman Fine Grain Duplicating Panchromatic Negative Film developed to a low gamma of 0.4. Other materials may need different contrast combinations and there are no standards for this procedure.
The filters used are usually Wratten 98,99, and 70, but other "wider cut" sets such as 47B, 61, 29 or the widest, 47B, 58, 25, produce less saturated final prints that may be more like the original images.