CUEING METHODS
The article on Grading/Timing might also be of interest to you
Cueing is the method we use to transfer the results of grading to the printing machine. Whatever method we use for grading we will have two pieces of information we have to pass to the printing machine. “HOW MUCH LIGHT AND WHEN” The “how much light” is the result and purpose of our grading. The “when” is the point in the film when we want to give that particular amount of light. The “when” can be determined and communicated in many ways. The very first method was by the printing operator feeling for a join and making an exposure change at about the right time. This was not terribly satisfactory nor convenient because if there were a scene change without a join then he would not know where to make the change. The next step was to cut a notch at the join so that the operator could more easily feel the light change. It also meant that if you did not want a change at every join or wanted a change in between joins you could have one. Once the notch became established it was not long before different printing machine manufacturers began inventing systems to automate the light change mechanism.
Bell and
Howell
on
their D and J printers moved the notch to 6 frames after the scene change and
used the notch to operate a micro switch (often called an interrupter).
That micro switch operated an electromagnet
that was connected to the shutter operating mechanism via a calibrated
lever (numbered from 1 to 22). The
mechanics were arranged so that the operator could pre-set the light value and
when the micro switch was triggered that value was transferred to the shutter.
The operator then pre-selected the next light value.
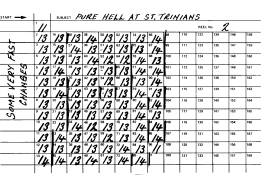 The
grading information was written on a card with each value in a box.
The machine had a pointer that moved down the card every time the micro
switch was operated. Because the operator only had the time between light
changes to set the next value it was normal practice to indicate fast changes.
The fast change was sometimes a box around the light or a line down the side of
the lights. Debrie printers and others used the notch cut at the scene change.
The Debrie notch is longer than the B&H. Because the micro switch is
above the gate a rotary switch is used to delay the light change until the
correct frame is in the gate.
The
grading information was written on a card with each value in a box.
The machine had a pointer that moved down the card every time the micro
switch was operated. Because the operator only had the time between light
changes to set the next value it was normal practice to indicate fast changes.
The fast change was sometimes a box around the light or a line down the side of
the lights. Debrie printers and others used the notch cut at the scene change.
The Debrie notch is longer than the B&H. Because the micro switch is
above the gate a rotary switch is used to delay the light change until the
correct frame is in the gate.
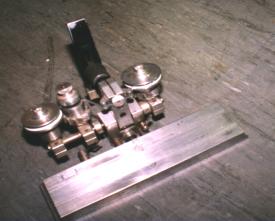
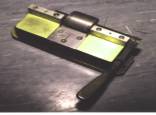 Debrie
Notcher Left; Bell & Howell Notcher below.
Debrie
Notcher Left; Bell & Howell Notcher below.
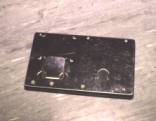
 Bell and Howell Notch
The
notch was the standard method for cueing films; you will often find that the
negative will have B&H notches on the one side and Debrie notches on the other
side. This is because the answer
and show print would have been printed on a continuous printer such as the B&H
Model D for speed and when the Fine Grain Duplicating Positive would be made on
a Debrie step printer for maximum picture quality and steadiness and to avoid
perforation pitch
problems you get on a rotary printer when making two stage dupes.
Normally the negative is short pitch and the positive is long pitch
because they are lying on top of each other on the rotary printer’s main
sprocket. When you are making a
Fine Grain Duplicating Positive and then a duplicate negative on a rotary
printer they would both
It was
standard practice in laboratories to pre-notch negatives particularly feature
films. Every scene in the film
would be notched before the film passed to the grader, usually where there was a
cut-in dissolve a notch would be put at the start of the optical
and another one at the mid point of the dissolve.
Pre-notching a film speeded up the work of the grader and allowed him to
get on with the grading and not
have to notch the scenes as he went along.
It did mean that sometimes you could have a lot of unnecessary light
changes.
 Lawley introduced
the Lawley Clip to avoid the use of notches.
The Lawley clip was a nickel-s
Lawley introduced
the Lawley Clip to avoid the use of notches.
The Lawley clip was a nickel-s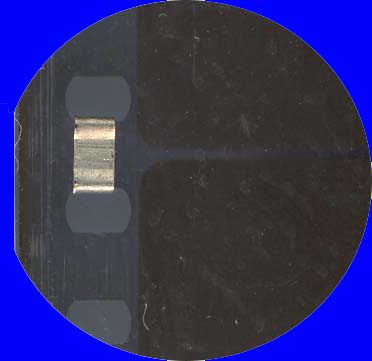 ilver
staple that in 35mm was wrapped around the film between the perforations.
The staples were used to activate a pair of contacts.
Each light change required two staples because besides the first clip
causing the light change the second clip also gave the light value that was
determined by its position. This
system had the great advantage that there were no charts, cards or bands to
lose. The disadvantage was that it
was (and is) quite difficult to remove clips even though Lawley provided a
de-clipper. The easiest method, if
you have nerves of steel and a steady hand, is to use two knife blades to open
up the clip, but do not practice on a valuable negative.
ilver
staple that in 35mm was wrapped around the film between the perforations.
The staples were used to activate a pair of contacts.
Each light change required two staples because besides the first clip
causing the light change the second clip also gave the light value that was
determined by its position. This
system had the great advantage that there were no charts, cards or bands to
lose. The disadvantage was that it
was (and is) quite difficult to remove clips even though Lawley provided a
de-clipper. The easiest method, if
you have nerves of steel and a steady hand, is to use two knife blades to open
up the clip, but do not practice on a valuable negative.
Debrie
introduced a frame count type of system.
It is some times known as a long chart.
The film was graded on a special Debrie synchroniser table with a roll of
cardboard or parchment film, that ran through the synchroniser at 1/8 the speed
of the negative. Every time the grader wanted a light change he used a punch to
cut a small rectangular hole in the chart.
When the negative was printed the chart ran through a head on the printer
that had feelers to detect the holes and operate the light change. The system
had the advantage that there were no notches in the negative but had the
disadvantage that the table was required for grading or regrading so making a
correction quite time consuming.
The next
system to be introduced was the RFQ
.
This was a small adhesive aluminum tab that was stuck on the film when a
change was required. The printing
machine was equipped with a metal
detector probe that detected the tab as it passed close to the probe.
The RFQ stands for Radio Frequency Cue
because the electronics used radio frequencies.
This
In recent years frame count cueing has been introduced.